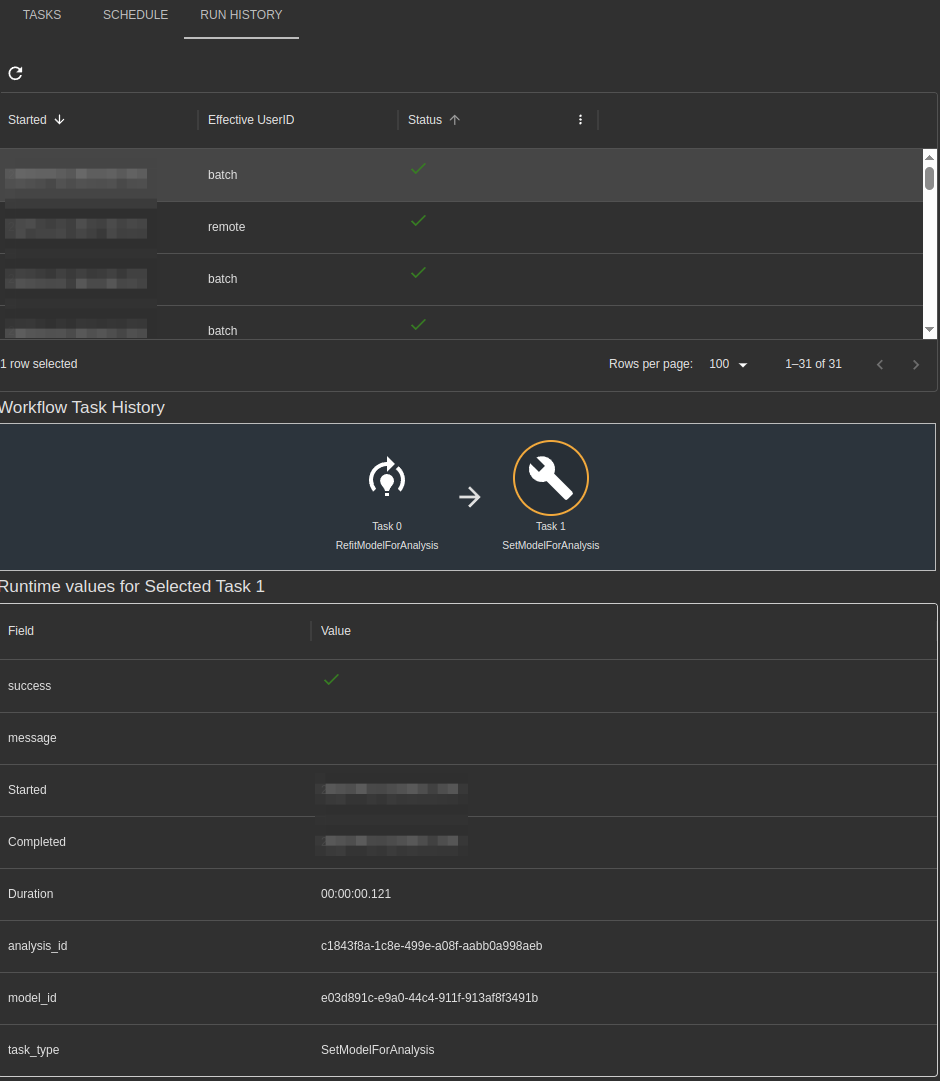
You may want to automate the re-building of models from time to time. Workflows allow you to run several tasks, sequentially, on a schedule (or called via the API). You can monitor previous workflow executions, including whether any of the task steps within the workflow failed.
For example, you may want to
- Re-fit the model for an analysis on the latest available data
- Re-scan the available tables/views from the source database
- Refresh a materialized view in your database to ensure the very latest data is available
Available Tasks
| Task | Used For |
|---|---|
| Refit Model | Fit a new model, as defined by a particular Analysis. The model is re-fitted on the latest available data and saved, but it is not automatically made the “active” model. See Manage Existing Analysis Models for details on how a single Analysis contains multiple versions of a model. |
| Set Active Model | Makes a given Model the “active” model for a given Analysis. |
| Execute SQL Query | Runs an arbitrary SQL command. This should be a DLL or similar command that does not return any results. |
| Database Metadata Crawler | Scan a data source for the latest available tables/views/columns |
| Export Forecasts | Export forecasts back into a source database. |
| Get Model Statistic | Load the value of a statistic from a model |
Creating and Editing Workflows
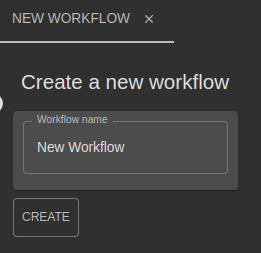
Click to add a new workflow, or open an existing workflow from the left-hand navigation menu. For a new workflow, give it a name and click” Create”. You will then be in the task editor.
Add and remove tasks from the workflow
You may add tasks to the start, end, or in between any other pair of tasks in a workflow. In all cases, clicking add will reveal a sub-menu to selected task type, at which point it will be added to the flow.
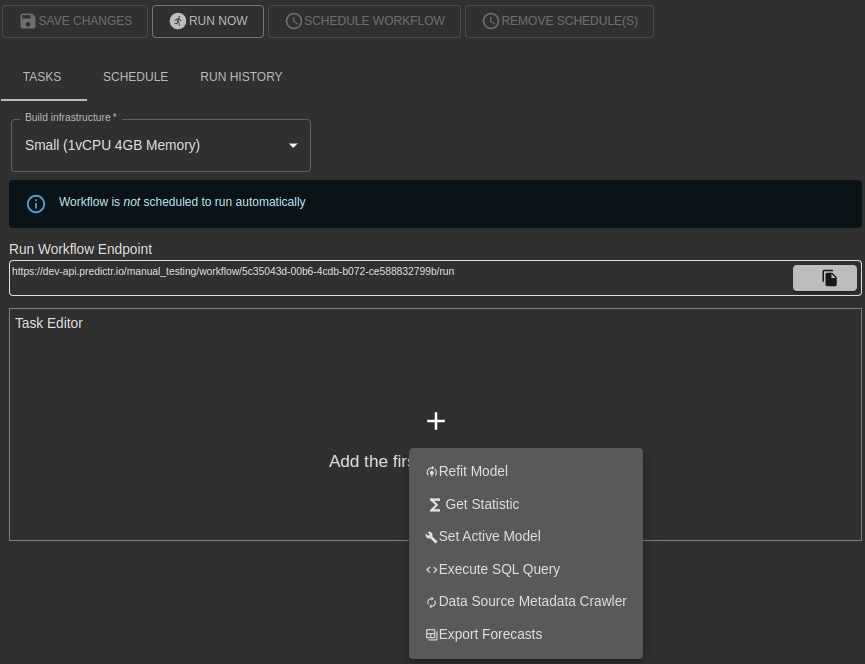
All tasks have a number, starting at zero, which is important for parameter linking/referencing - see below for more details and an example.
Workflows execute from left-to-right and, if any task fails, the whole flow is halted.
Workflow parameters
Each task type has a set of parameters. Some parameter are mandatory, while some are read-only and set duration task execution dynamically. In either case, the run history will keep the actual values used during that run.
Parameter types
Mandatory:
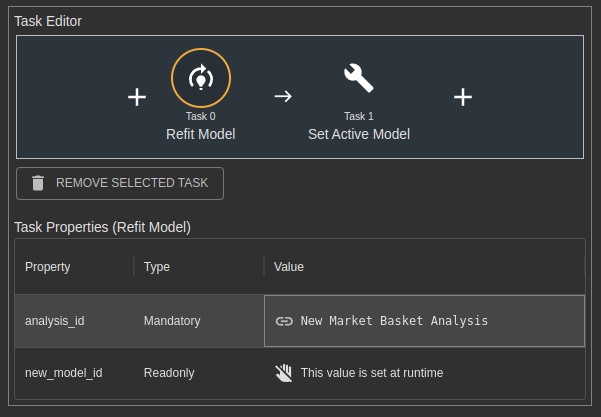
Read-only: These parameters are assigned a value at runtime by the task itself, for example the Refit Model task creates a new model, so stores the new Model ID into a read-only field to be referenced by other tasks.
Finding ID fields
Many parameters require Object Identifiers to function correctly. For connections and analysis, the UI provides a way to select the Object Name instead, and this is translated to the ID behind the scenes, for example, the connection ID below points to the “bigquery” connection.
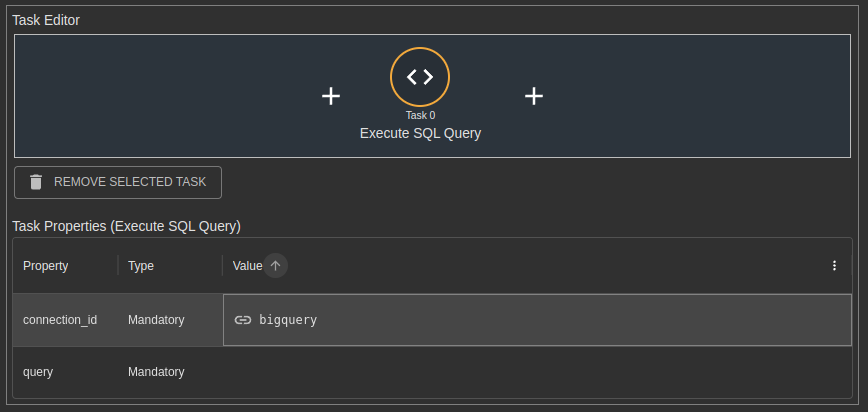
Click on any value to edit it.
Task Parameters
The specific parameters for each task type are documented below.
| Task | Parameter | Type |
|---|---|---|
| Refit Model | analysis_id | Mandatory |
| new_model_id | Read-only | |
| Set Active Model | analysis_id | Mandatory |
| model_id | Mandatory | |
| Execute SQL Query | connection_id | Mandatory |
| query | Mandatory | |
| Data Source Metadata Crawler | connection_id | Mandatory |
| Export Forecasts | model_id | Mandatory |
| target_schema | Mandatory | |
| target_table | Mandatory | |
| periods | Mandatory | |
| include_history | Mandatory | |
| column_mapping | Mandatory | |
| constants | Optional |
Parameter Linking / Referencing
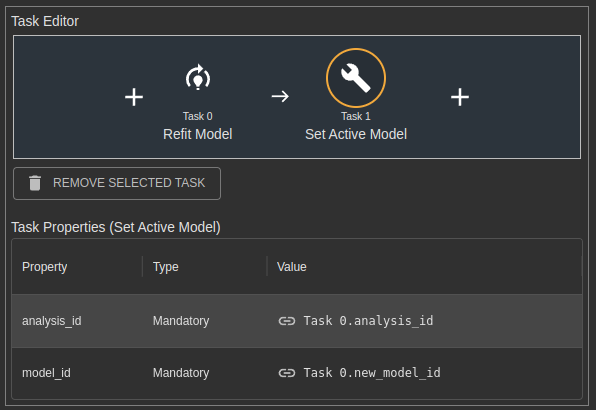
The example below shows (a) refitting a model for an existing analysis, and (b) making that model the active model for that analysis.
The “Set Active Model” task therefore needs to know a model ID that only exists once the previous task, Refit Model, completes. The setting therefore uses a reference to the previous task’s new_model_id, which itself is only populated at runtime. See the screenshots below
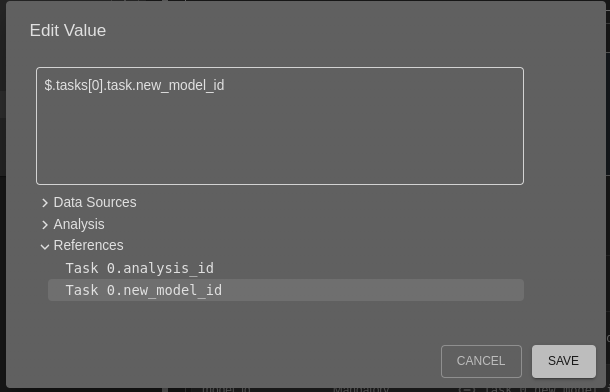 The value,
 $.tasks[0].task.new_model_id, is generated by clicking on a reference in the tree, you shouldn’t have to enter it manually.
Scheduling / API Invocation
Once a workflow exists, it can be run in 3 ways
- By clicking the “Run Now” button on a saved workflow

- A schedule can be set in the “Schedule” tab. Set Minutes, Hours, Days of Month, Months, Days of Week and Years using “cron” rules (see below). If the expression is valid, you will be able to Save the workflow, and once saved, the Schedule Workflow button will be available. It can be unscheduled any time later.
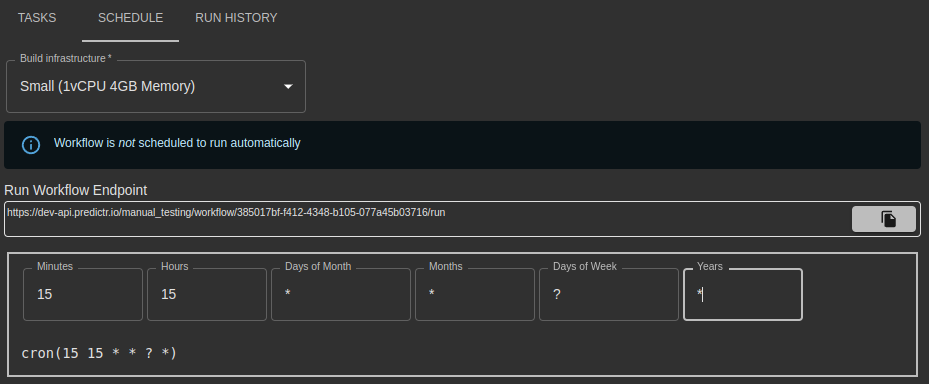
- An API call can be made to the provided “Run Workflow Endpoint” in the UI using a POST request. Via the API, the same workflow can be invoked multiple times with different sets of parameters - contact us for more details on how to do this.
Cron Rules
- Fields can contain multiple, comma separate numbers.
- Days of Week can use numbers 1-7 or SUN-SAT
- Month can use 1-12 or JAN-DEC
- A range can be specified using a dash (e.g. 2-6 in day of week would run Monday through Friday inclusive)
- ? means “Any”. You must use a ? in either Day-of-month or Day-of-week fields
- L in day-of-month or day-of-week means the Last day of that period
- W in day-of-month specified a weekday, e.g. 3W means the weekday closest to the third day of the month
Viewing the results of previous runs
Regardless of how a run is invoked, the Run History tab shows all previous runs. Clicking a run will load a read-only view of the task editor which represents the workflow when it was run (even if it has subsequently been modified). Clicking on each task in the flow will show the runtime data for each task - start, end and duration, the success status and any error message if something failed.